Atom Lab logo

How to setup email authentication with React Native and Firebase

Request, Deliver, Revise, Done

Get unlimited UI Design & React Development for a fixed monthly price

50% off your first month

Introduction

If you don't want to write your own authentication from scratch you're going to want to reach for a third-party solution - luckily Firebase has a great authentication service that works very well with React Native.

In this tutorial I'll show you how to get it set up with traditional email-based authentication - including how to implement signup, login and password reset flows.

Please note: this tutorial uses version 9 of the Firebase javascript SDK.

What is Firebase?

Firebase is essentially a backend as a service - it provides most of the backend functionality you're likely to want to use with a mobile application including authentication, storage and a realtime database.

Installing Firebase

For instructions on how to setup Firebase with React Native, please check out my quick guide.

Configuring email authentication with Firebase

Once you have your Firebase configuration setup by following the quick guide, import your auth instance in the component file where you want to anywhere you need to use authentication:

import { auth } from './yourFirebaseConfig';

Now you just need to enable email authentication for your Firebase project. Open the Firebase console and go to the authentication tab.

Click on the sign in methods tab at the top of the screen:

This will bring up a list of enabled authentication methods - click on the Add new provider button:

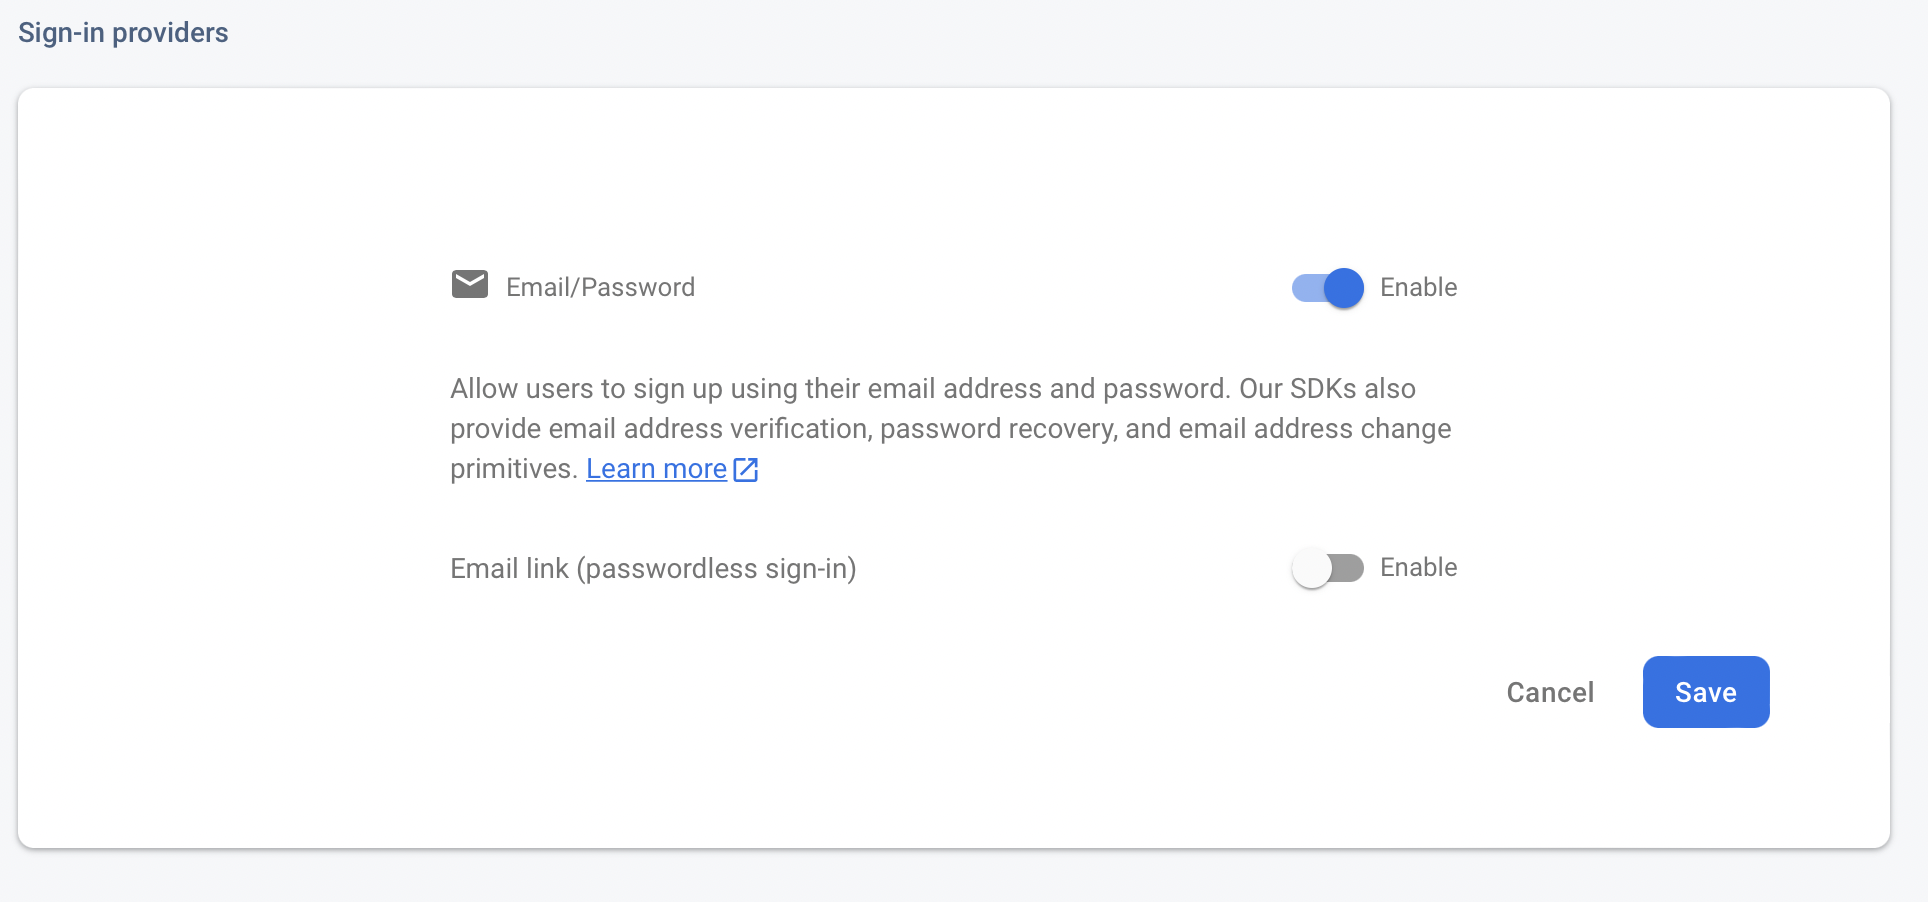
You’ll then see a list of available authentication methods - click on the Email/Password option to open the configuration form:

You’ll then see an enable toggle - set it to enabled and click save and we’re now ready to implement our email based authentication!
Setup your auth object

import { initializeApp } from 'firebase/app'; import { getAuth } from 'firebase/auth'; // Initialize Firebase const firebaseConfig = { apiKey: 'YOUR_FIREBASE_API_KEY', authDomain: 'YOUR_FIREBASE_AUTH_DOMAIN', databaseURL: 'YOUR_FIREBASE_DATABASE_URL', projectId: 'YOUR_FIREBASE_PROJECT_ID', storageBucket: 'YOUR_FIREBASE_STORAGE_BUCKET', messagingSenderId: 'YOUR_FIREBASE_MESSAGING_SENDER_ID', appId: 'YOUR_FIREBASE_APP_ID', measurementId: 'YOUR_FIREBASE_MEASUREMENT_ID', }; const app = initializeApp(firebaseConfig); export const auth = getAuth(); export default app;

Checking if a user is logged in

First things first, we’re going to use a Firebase method called onAuthStateChanged to check whether the user is logged in. For the moment this won’t do anything as we don’t have login and signup forms but eventually this will form the basis of our routing:

onAuthStateChanged(auth, (user) => { if (user) { // user is logged in } else { // user is not logged in } });

Let’s create our main app component and add a loggedIn state whose value will be set by this function:

import React, { useState } from 'react'; import { View, Text } from 'react-native'; import { onAuthStateChanged } from 'firebase/auth'; import { auth } from './firebase'; export default function App() { const [loggedIn, setLoggedIn] = useState(false); onAuthStateChanged(auth, (user) => { if (user) { setLoggedIn(true); } else { setLoggedIn(false); } }); return ( <View> <Text>App</Text> </View> ); }

We can now use this loggedIn value to conditionally render content depending on whether the user is logged in or not.

Add a logged in page

Let’s add a basic page for our logged in users which will also contain a logout button (I’m going to create it in the same file as our App component for the sake of this tutorial - but feel free to create a separate file):

function LoggedIn() { return ( <View style={{ flex: 1, justifyContent: 'center', alignItems: 'center' }}> <Text>Logged in</Text> </View> ); }

Import the signOut method from Firebase at the top of your file:

import { signOut } from 'firebase/auth';

Then we can add a method to our loggedIn component that will sign a user out:

import React, { useState } from 'react'; import { View, Text, Button } from 'react-native'; import { onAuthStateChanged, signOut } from 'firebase/auth'; import { auth } from './firebase'; function LoggedIn() { const logout = async () => { try { await signOut(auth); } catch (e) { console.error(e); } }; return ( <View style={{ flex: 1, justifyContent: 'center', alignItems: 'center' }}> <Text>Logged in</Text> </View> ); } export default function App() { // }

Then we can create a logout button that will call this method:

import React, { useState } from 'react'; import { View, Text, Button } from 'react-native'; import { onAuthStateChanged, signOut } from 'firebase/auth'; import { auth } from './firebase'; function LoggedIn() { const logout = async () => { try { await signOut(auth); } catch (e) { console.error(e); } }; return ( <View style={{ flex: 1, justifyContent: 'center', alignItems: 'center' }}> <Text>Logged in</Text> <Button title="Log out" onPress={logout} /> </View> ); } export default function App() { // }

This should then logout the user and the onAuthStateChanged method in the App component will fire with no user returned - meaning the loggedIn state will now be false.

Of course, we can’t actually log out a user yet because there’s no way to log in or create one - so let’s fix that by creating a signup form.

Setting up basic routing

Let’s start by adding a basic component which will eventually contain our signup form:

function Signup() { return ( <View style={{ flex: 1, justifyContent: 'center', alignItems: 'center' }}> <Text>Sign up</Text> </View> ); }

Now let’s add some basic routing to our App component depending on whether the user is logged in or not. For the moment we just have two screens - our LoggedIn component and our Signup component.

We’ll create a getScreen method and then call that as the child of our App component. If the loggedIn state is true - we return the LoggedIn component. If it’s false, we return the Signup component.

export default function App() { const [loggedIn, setLoggedIn] = useState(false); onAuthStateChanged(auth, (user) => { if (user) { setLoggedIn(true); } else { setLoggedIn(false); } }); const getScreen = () => { if (loggedIn) return <LoggedIn />; return <Signup />; }; return <View style={{ flex: 1 }}>{getScreen()}</View>; }

Building a signup form

Now we have our routing setup we can create our signup form. We’ll start by creating four state values - one for our username, one for the password and one to confirm the password - and another to hold any error messages that Firebase returns so we can display them to the user:

function Signup() { const [email, setEmail] = useState(''); const [password, setPassword] = useState(''); const [confirmPassword, setConfirmPassword] = useState(''); const [error, setError] = useState(null); return ( <View style={{ flex: 1, justifyContent: 'center', alignItems: 'center' }}> <Text>Sign up</Text> </View> ); }

Then from React Native we need to import the TextInput and StyleSheet components:

import { View, Text, Button, TextInput, StyleSheet } from 'react-native';

We could style each TextInput individually but this will quickly become repetitive - instead at the bottom of the file (outside of your components) add the following:

const styles = StyleSheet.create({ outer: { flex: 1, justifyContent: 'center', alignItems: 'center', }, inner: { width: 240, }, header: { fontSize: 24, fontWeight: 'bold', marginBottom: 20, }, input: { borderWidth: 1, borderColor: '#ccc', borderRadius: 4, paddingVertical: 8, paddingHorizontal: 12, marginBottom: 16, }, error: { marginBottom: 20, color: 'red', }, });

Using the styles object we can now share styles between our different components.

Now let’s amend our signup form component - we’ll add an outer container, an inner container that will hold the form, the three TextInput’s for our username and password fields, and a Button to handle submission.

function Signup() { const [email, setEmail] = useState(''); const [password, setPassword] = useState(''); const [confirmPassword, setConfirmPassword] = useState(''); const [error, setError] = useState(null); const createAccount = () => { // create account }; return ( <View style={styles.outer}> <View style={styles.inner}> <Text style={styles.header}>Signup</Text> <TextInput value={email} onChangeText={setEmail} keyboardType="email-address" placeholder="Enter email address" autoCapitalize="none" placeholderTextColor="#aaa" style={styles.input} /> <TextInput value={password} onChangeText={setPassword} secureTextEntry placeholder="Enter password" autoCapitalize="none" placeholderTextColor="#aaa" style={styles.input} /> <TextInput value={confirmPassword} onChangeText={setConfirmPassword} secureTextEntry placeholder="Confirm password" autoCapitalize="none" placeholderTextColor="#aaa" style={styles.input} /> <Button title="Create Account" onPress={createAccount} disabled={!email || !password || !confirmPassword} /> </View> </View> ); }

There are a few of things to take note of here if you’re new to React Native.

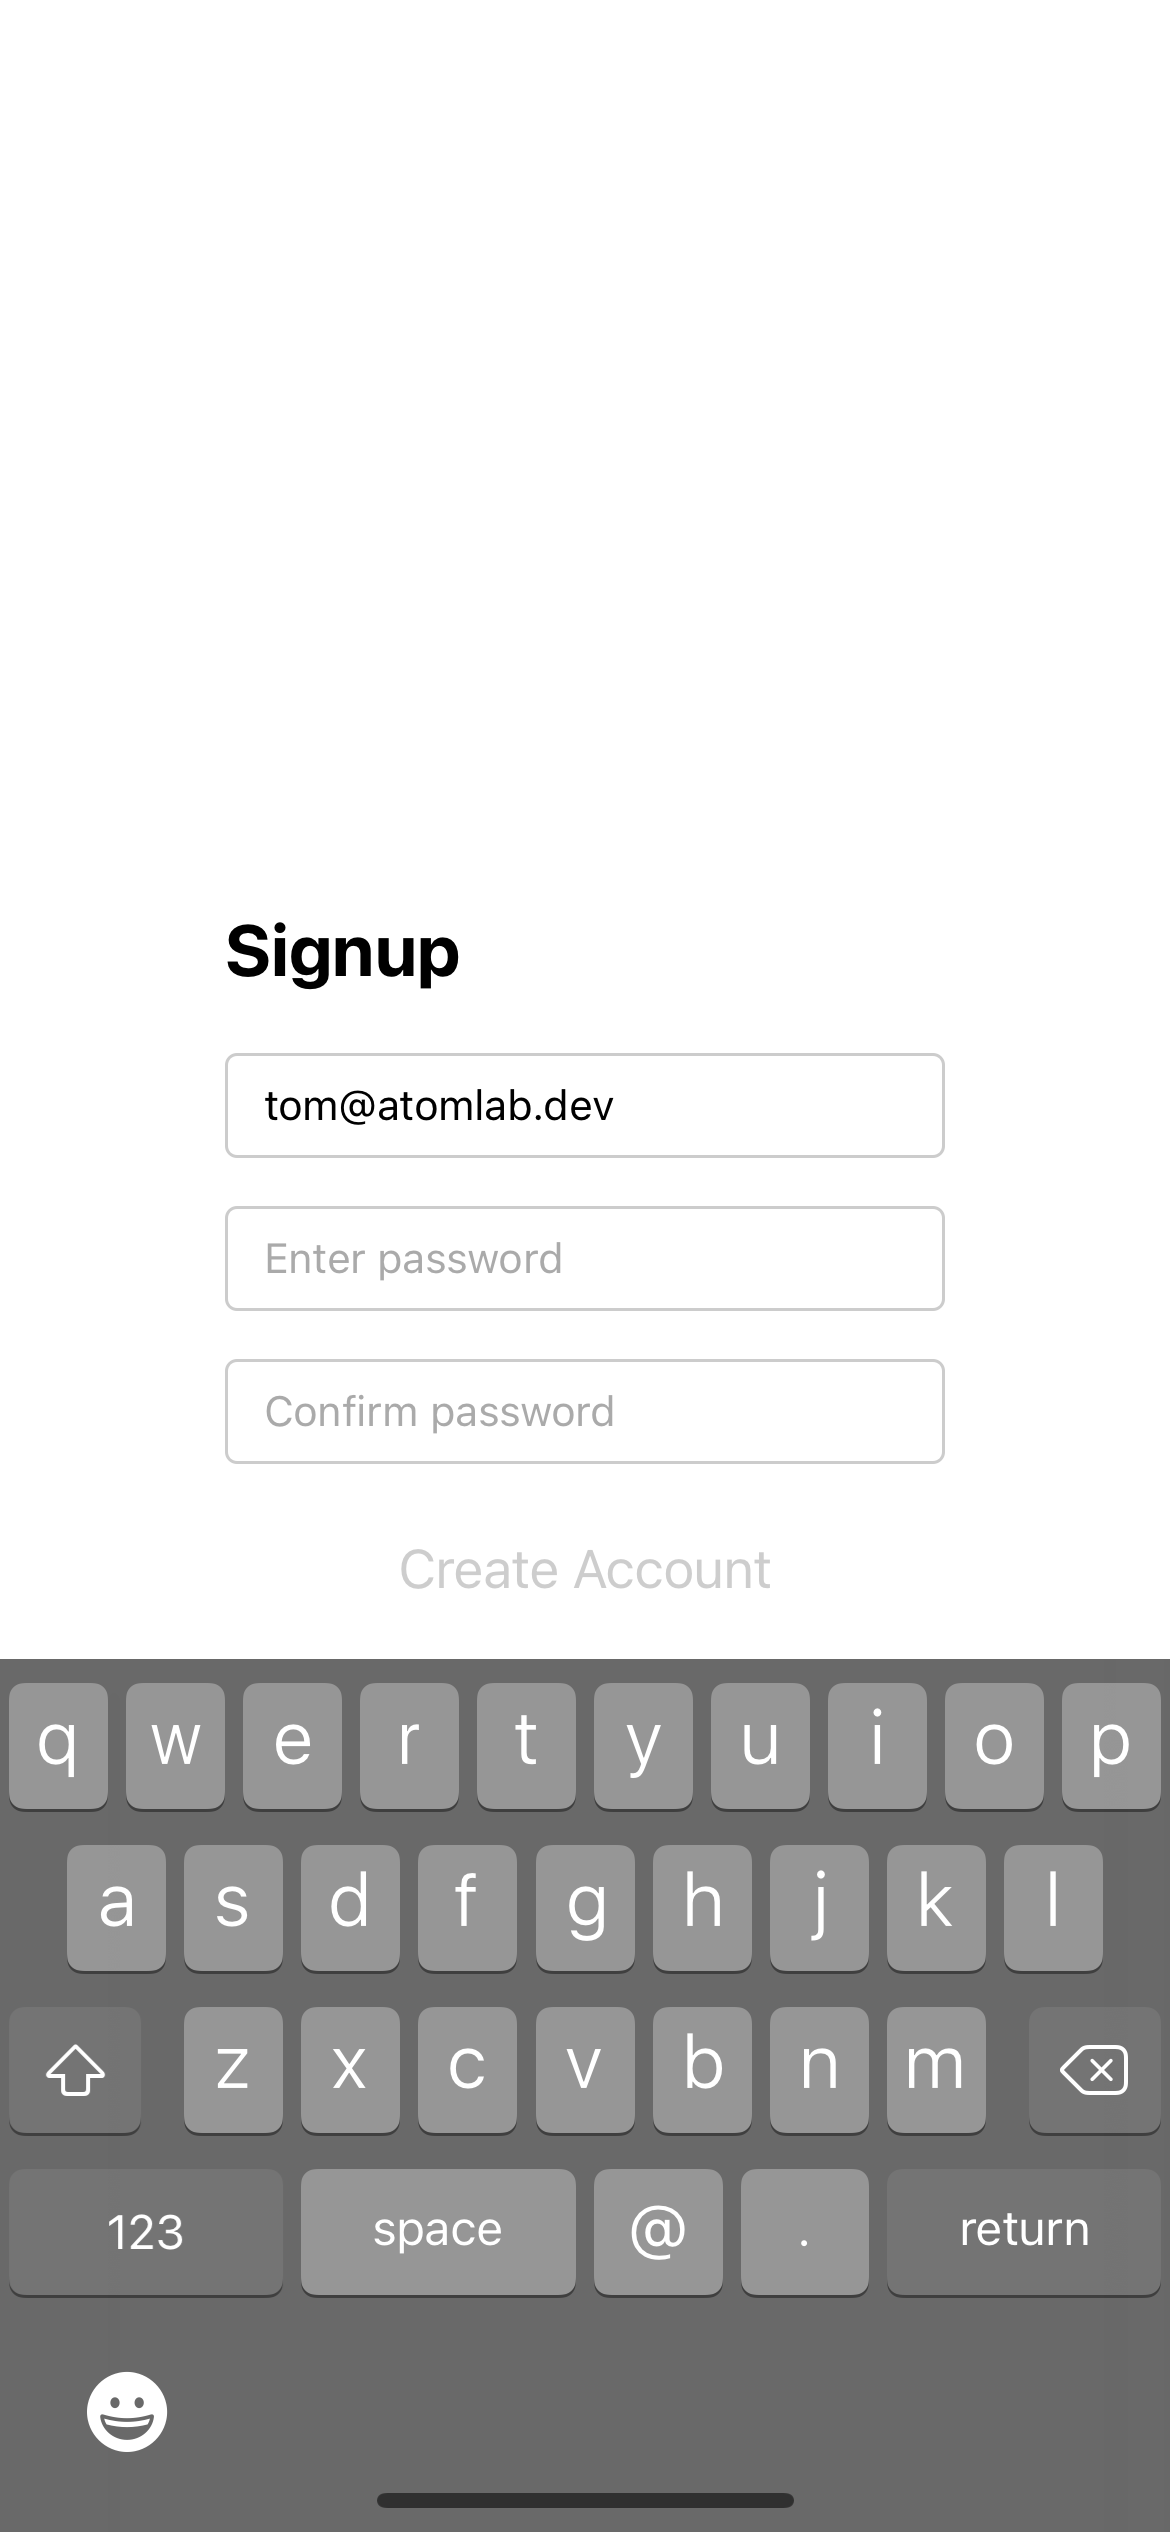
For our email address TextInput we set the keyboardType prop to email address - this will mean when you’re typing in this field, your device will display the correct native keyboard that’s designed for entering email addresses (otherwise the user will need to navigate through different keyboards manually to find the @ symbol, which is annoying).
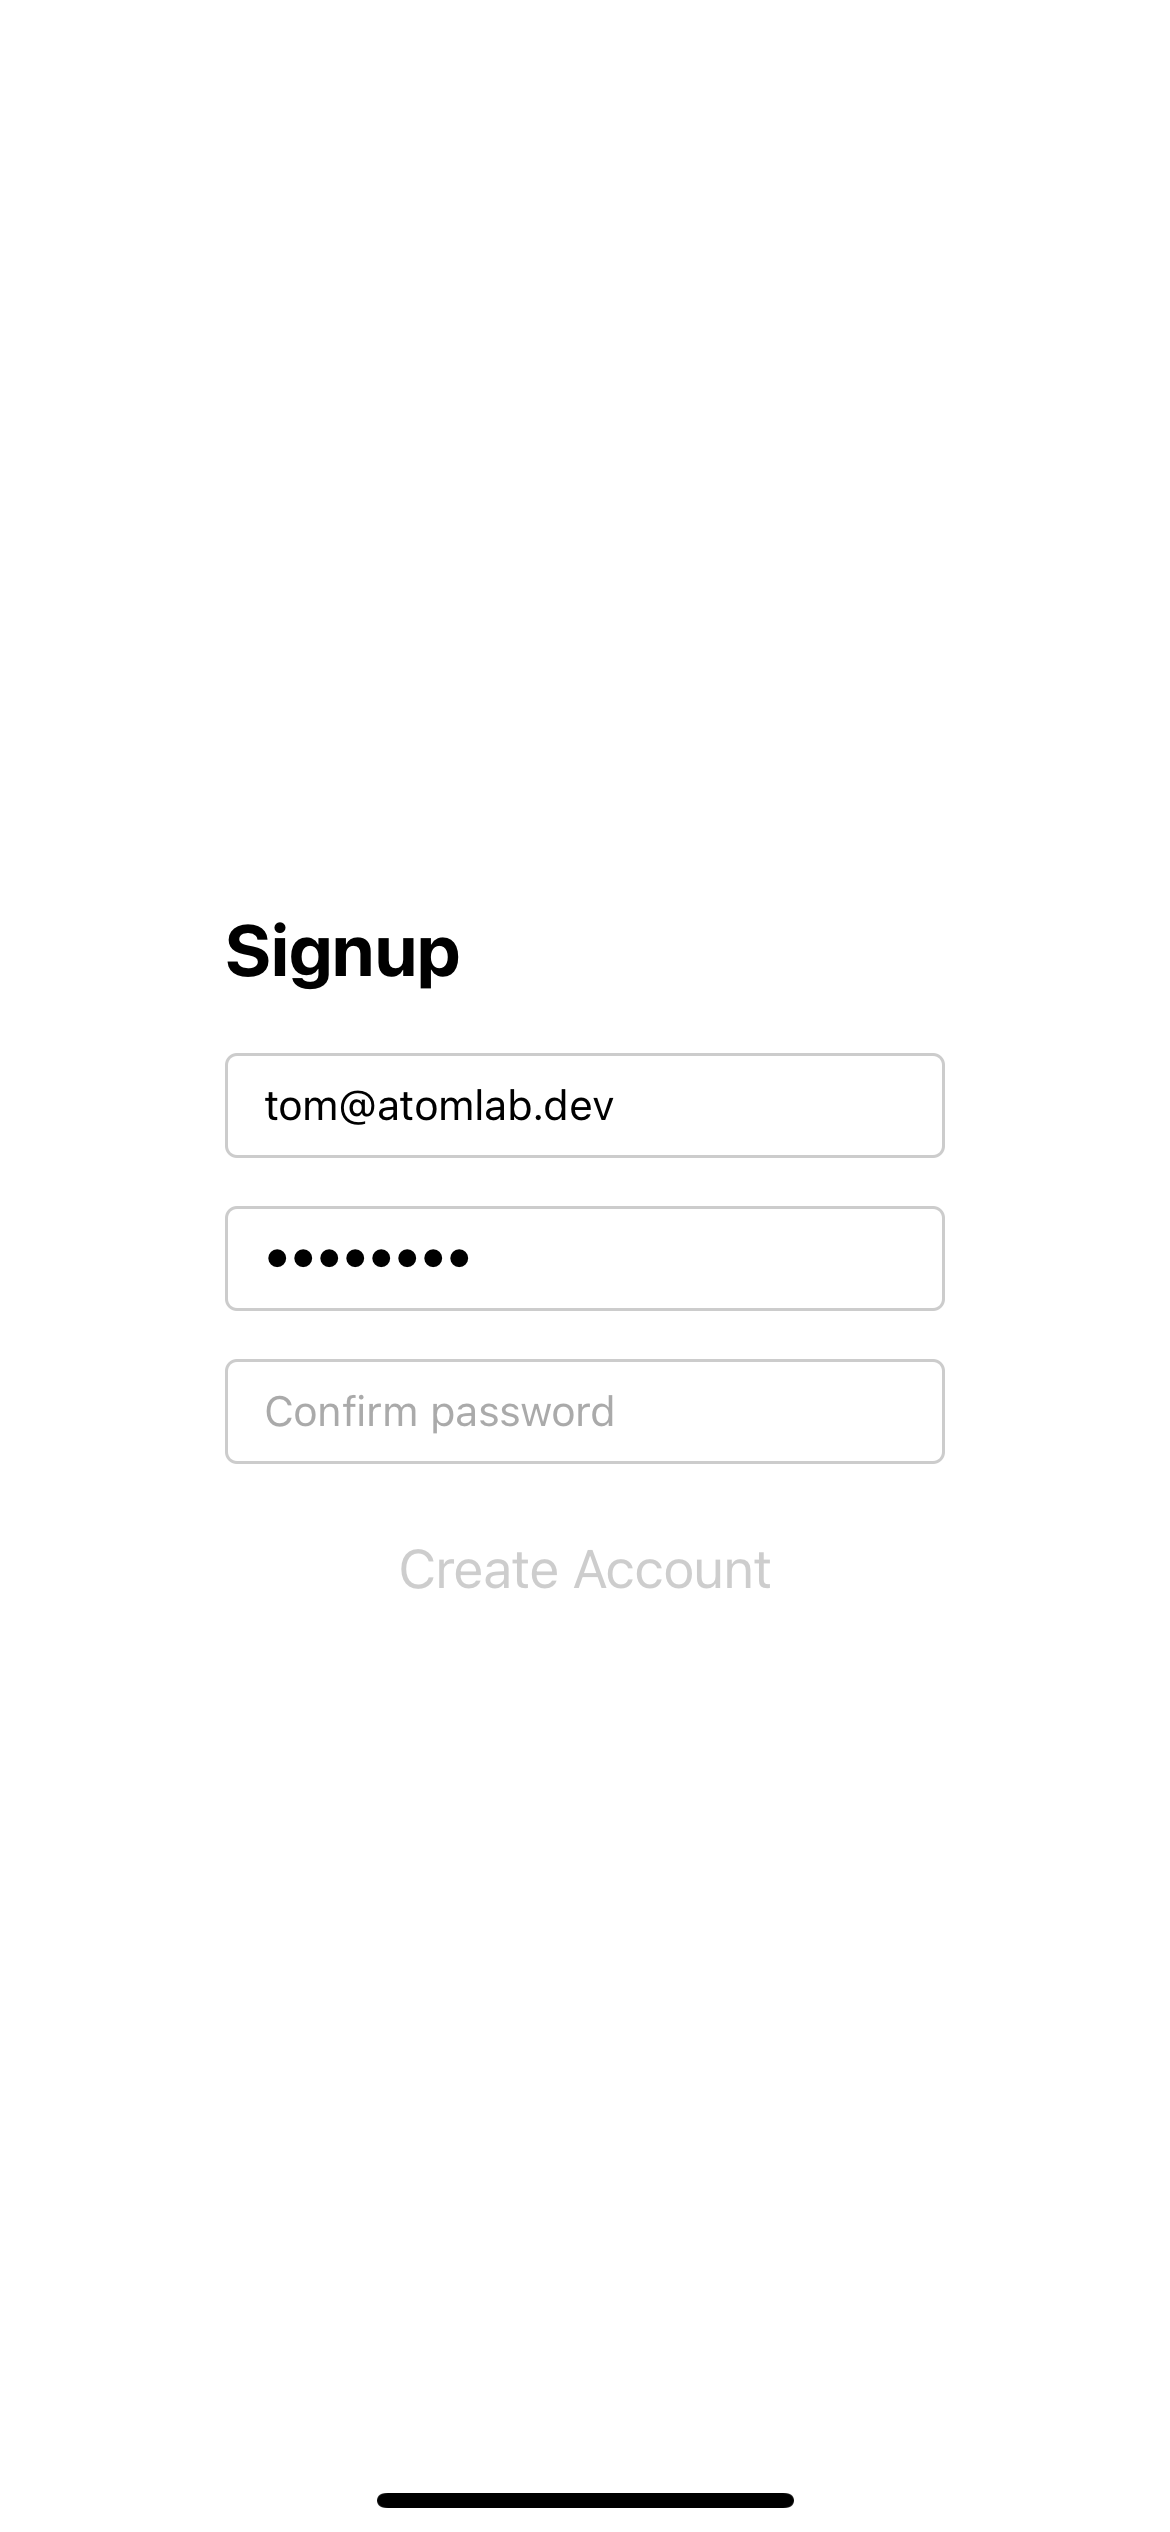
For our password field we add the prop secureTextEntry which ensures that the text is starred when entered, rather than displayed as plain text.
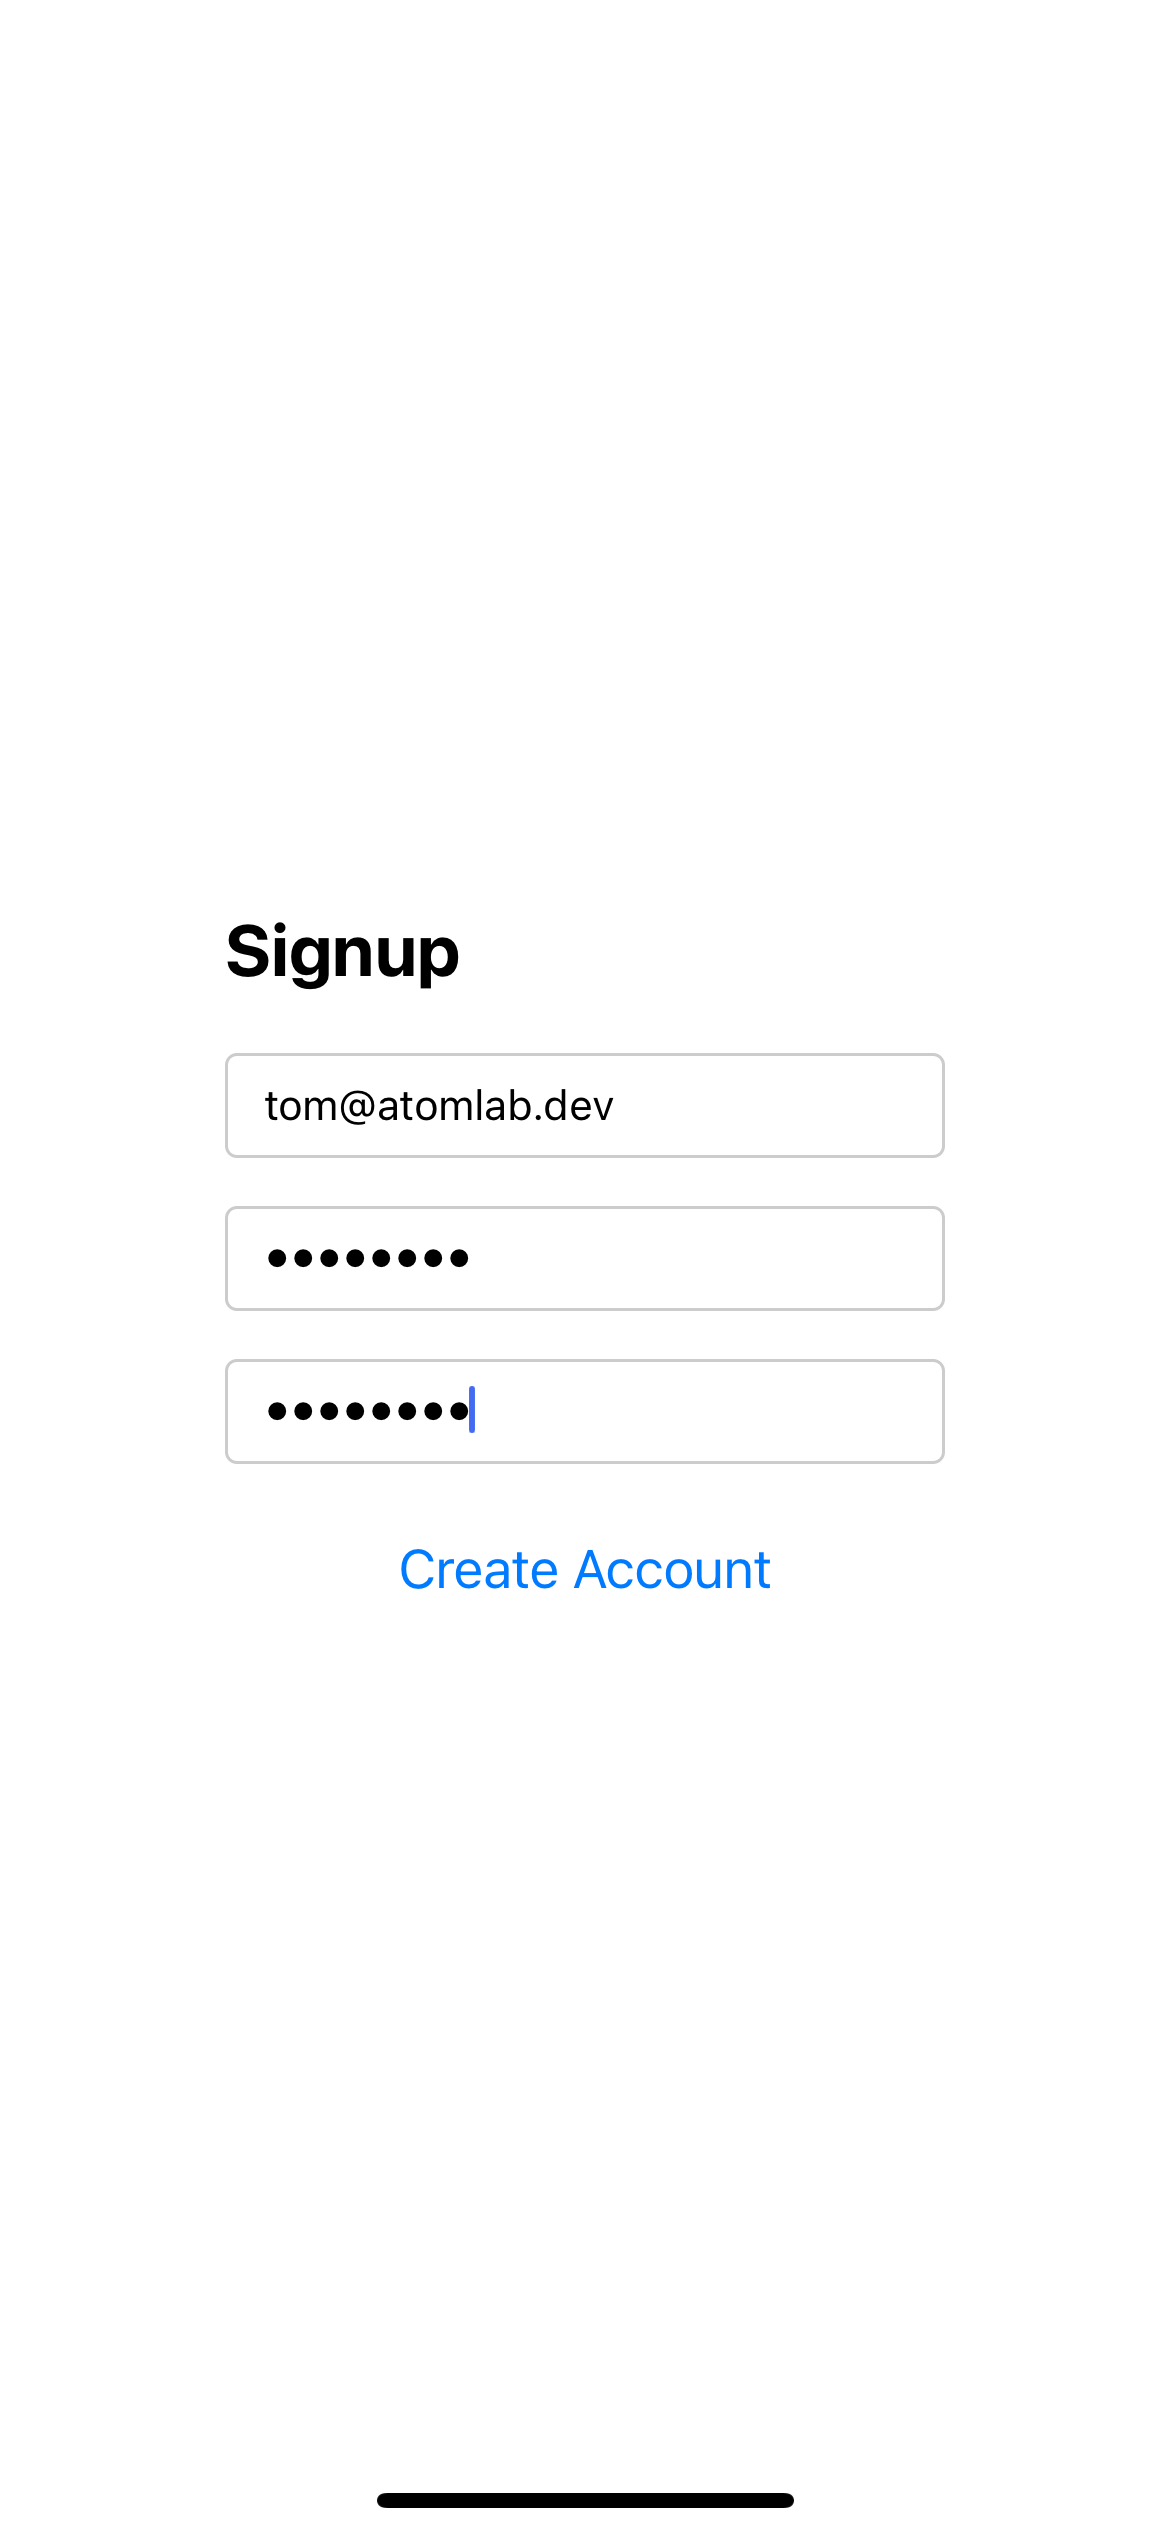
Finally for our submit button we set the disabled prop by checking if any of the three fields have not been filled in - if the result of this check is true then the button will be disabled. Once all three have values and the check returns false, then disabled will be set to false and our button becomes clickable.
Now we can wire up our createAccount function so that it actually creates and account with Firebase. We’re going to use the createUserWithEmailAndPassword method:

import { onAuthStateChanged, signOut, createUserWithEmailAndPassword } from 'firebase/auth';

In our createAccount function we’re going to add the method and pass it our auth instance, as well as the email and password - that will send a request to firebase to create an account with the provided credentials.

If the account is created successfully then the onAuthStateChanged method will fire in the App component and the user will see the logged in page. If it fails, the catch portion of the async function will run and the error will be written to the error state, and will display to the user.

const createAccount = async () => { try { await createUserWithEmailAndPassword(auth, email, password); } catch (e) { setError('There was a problem creating your account'); } };

One more thing - let’s add a check to make sure that both password fields match. In our try catch block we’ll add a conditional to check the password and confirmPassword state values match - if they don’t, we’ll set our error message to something letting the user know they don’t match.

const createAccount = async () => { try { if (password === confirmPassword) { await createUserWithEmailAndPassword(auth, email, password); } else { setError("Passwords don't match"); } } catch (e) { setError('There was a problem creating your account'); } };

Let’s also add our error message using the error style we added earlier as part of our StyleSheet object, below the heading:

{ error && <Text style={styles.error}>{error}</Text>; }

Here’s our signup component in full. Assuming you followed the configuration steps correctly you should now be able to use fill out the form and see your account details appear in the Firebase console!
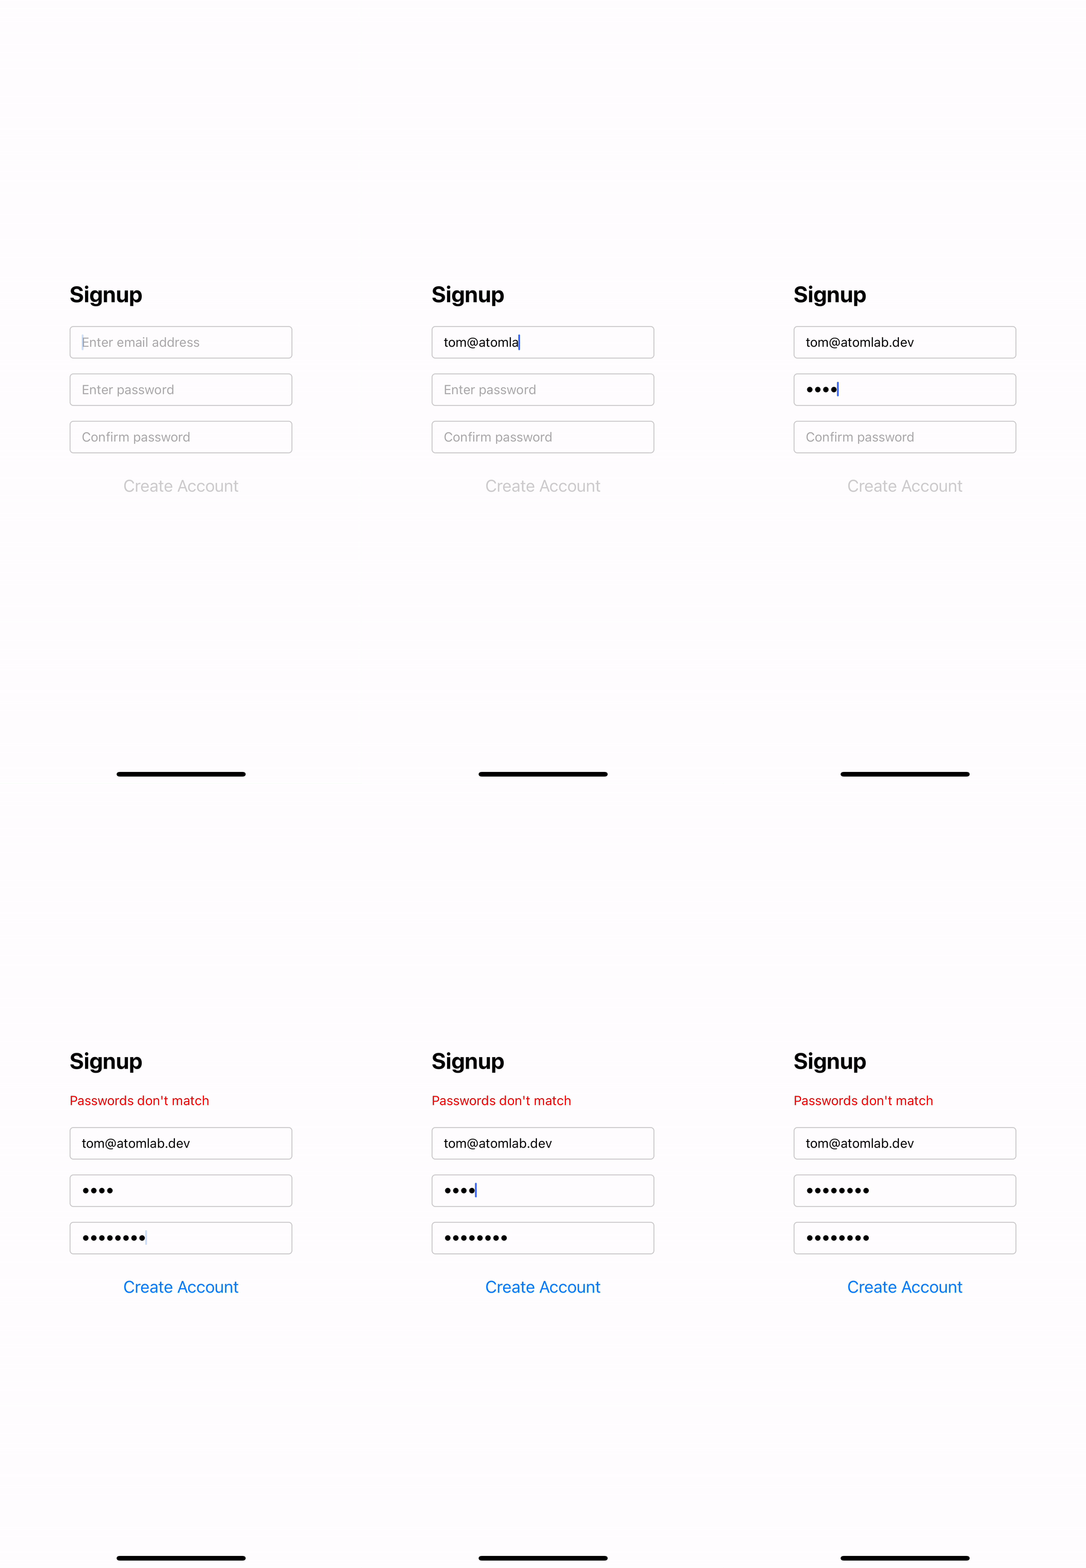
function Signup() { const [email, setEmail] = useState(''); const [password, setPassword] = useState(''); const [confirmPassword, setConfirmPassword] = useState(''); const [error, setError] = useState(null); const createAccount = async () => { try { if (password === confirmPassword) { await createUserWithEmailAndPassword(auth, email, password); } else { setError("Passwords don't match"); } } catch (e) { setError('There was a problem creating your account'); } }; return ( <View style={styles.outer}> <View style={styles.inner}> <Text style={styles.header}>Signup</Text> {error && <Text style={styles.error}>{error}</Text>} <TextInput value={email} onChangeText={setEmail} keyboardType="email-address" placeholder="Enter email address" autoCapitalize="none" placeholderTextColor="#aaa" style={styles.input} /> <TextInput value={password} onChangeText={setPassword} secureTextEntry placeholder="Enter password" autoCapitalize="none" placeholderTextColor="#aaa" style={styles.input} /> <TextInput value={confirmPassword} onChangeText={setConfirmPassword} secureTextEntry placeholder="Confirm password" autoCapitalize="none" placeholderTextColor="#aaa" style={styles.input} /> <Button title="Create Account" onPress={createAccount} disabled={!email || !password || !confirmPassword} /> </View> </View> ); }

Building a login form

Now we can build a login form so we can actually use an existing account. Create a new component called Login and add some placeholder content:

function Login() { return ( <View style={styles.outer}> <View style={styles.inner}> <Text style={styles.header}>Login</Text> </View> </View> ); }

Now that we have a couple of screens we need to add some basic routing - as we want the user to be able to choose between logging in to an existing account or creating a new one.

In the App component we’re going to add a state value that will hold the current screen:

const [screen, setScreen] = useState(null);

In the getScreen method we’ll set it so that if loggedIn is true it will return the LoggedIn screen regardless of the screen value - if they’re not logged in and screen is set to signup it will return the signup component - and if screen is null or set to anything else it will return the login component:

const getScreen = () => { if (loggedIn) return <LoggedIn />; if (screen === 'signup') return <Signup />; return <Login />; };

Make sure you’re logged out and you should see your login screen when you open the app:

Now we need a way to toggle between our login screen and our signup screen. In the App component we’ll pass the setScreen method down as a prop to both the Login component and the Signup component, like so:

const getScreen = () => { if (loggedIn) return <LoggedIn />; if (screen === 'signup') return <Signup setScreen={setScreen} />; return <Login setScreen={setScreen} />; };

Now in your login screen let’s add a link which will set the screen value to “signup”. First we need to import the TouchableOpacity component from React Native:

import { View, Text, Button, TextInput, StyleSheet, TouchableOpacity } from 'react-native';

In our styles object we’ll then add a link style:

const styles = StyleSheet.create({ // ... link: { color: 'blue', marginBottom: 20, }, });

Then we can add the link to our login screen which will set the screen value to be signup:

function Login({ setScreen }) { return ( <View style={styles.outer}> <View style={styles.inner}> <Text style={styles.header}>Login</Text> <TouchableOpacity onPress={() => setScreen('signup')}> <Text style={styles.link}>Create an account</Text> </TouchableOpacity> </View> </View> ); }

Now let’s do the same in the Signup component so we can toggle between them:

function Signup({ setScreen }) { // .. return ( <View style={styles.outer}> <View style={styles.inner}> // ... <TouchableOpacity onPress={() => setScreen('login')}> <Text style={styles.link}>Login to existing account</Text> </TouchableOpacity> // ... </View> </View> ); }

If you reload your app you should now be able to toggle between the two different screens:

This is a very basic routing implementation for the purposes of this tutorial - if you’re building a production app I’d recommend using a proper routing solution such as React Navigation.

Building our login screen is pretty straightforward as we can repurpose much of the logic and layout from our signup screen - let’s start by adding state values for our email, password and any errors returned by Firebase, and their relevant components:

function Login({ setScreen }) { const [email, setEmail] = useState(''); const [password, setPassword] = useState(''); const [error, setError] = useState(null); const loginUser = () => { // }; return ( <View style={styles.outer}> <View style={styles.inner}> <Text style={styles.header}>Login</Text> {error && <Text style={styles.error}>{error}</Text>} <TouchableOpacity onPress={() => setScreen('signup')}> <Text style={styles.link}>Create an account</Text> </TouchableOpacity> <TextInput value={email} onChangeText={setEmail} keyboardType="email-address" placeholder="Enter email address" autoCapitalize="none" placeholderTextColor="#aaa" style={styles.input} /> <TextInput value={password} onChangeText={setPassword} secureTextEntry placeholder="Enter password" autoCapitalize="none" placeholderTextColor="#aaa" style={styles.input} /> <Button title="Login" onPress={loginUser} disabled={!email || !password} /> </View> </View> ); }

As you can see the loginUser function doesn’t actually do anything at the moment - in order to get it working we need to import the signInWithEmailAndPassword method from Firebase:

import { onAuthStateChanged, signOut, createUserWithEmailAndPassword, signInWithEmailAndPassword, } from 'firebase/auth';

We can then use this method in our loginUser function by passing in our auth instance and the email and password values:

const loginUser = async () => { try { await signInWithEmailAndPassword(auth, email, password); } catch (error) { // } };

Now we just need to handle any errors the user might encounter - we’ll explicitly handle if a user enters incorrect credentials or if their email is already in use - otherwise we’ll just return a generic error:

const loginUser = async () => { try { await signInWithEmailAndPassword(auth, email, password); } catch (error) { if (error.code === 'auth/invalid-email' || error.code === 'auth/wrong-password') { setError('Your email or password was incorrect'); } else if (error.code === 'auth/email-already-in-use') { setError('An account with this email already exists'); } else { setError('There was a problem with your request'); } } };

Now you should be able to login with the credentials you created during the signup process:
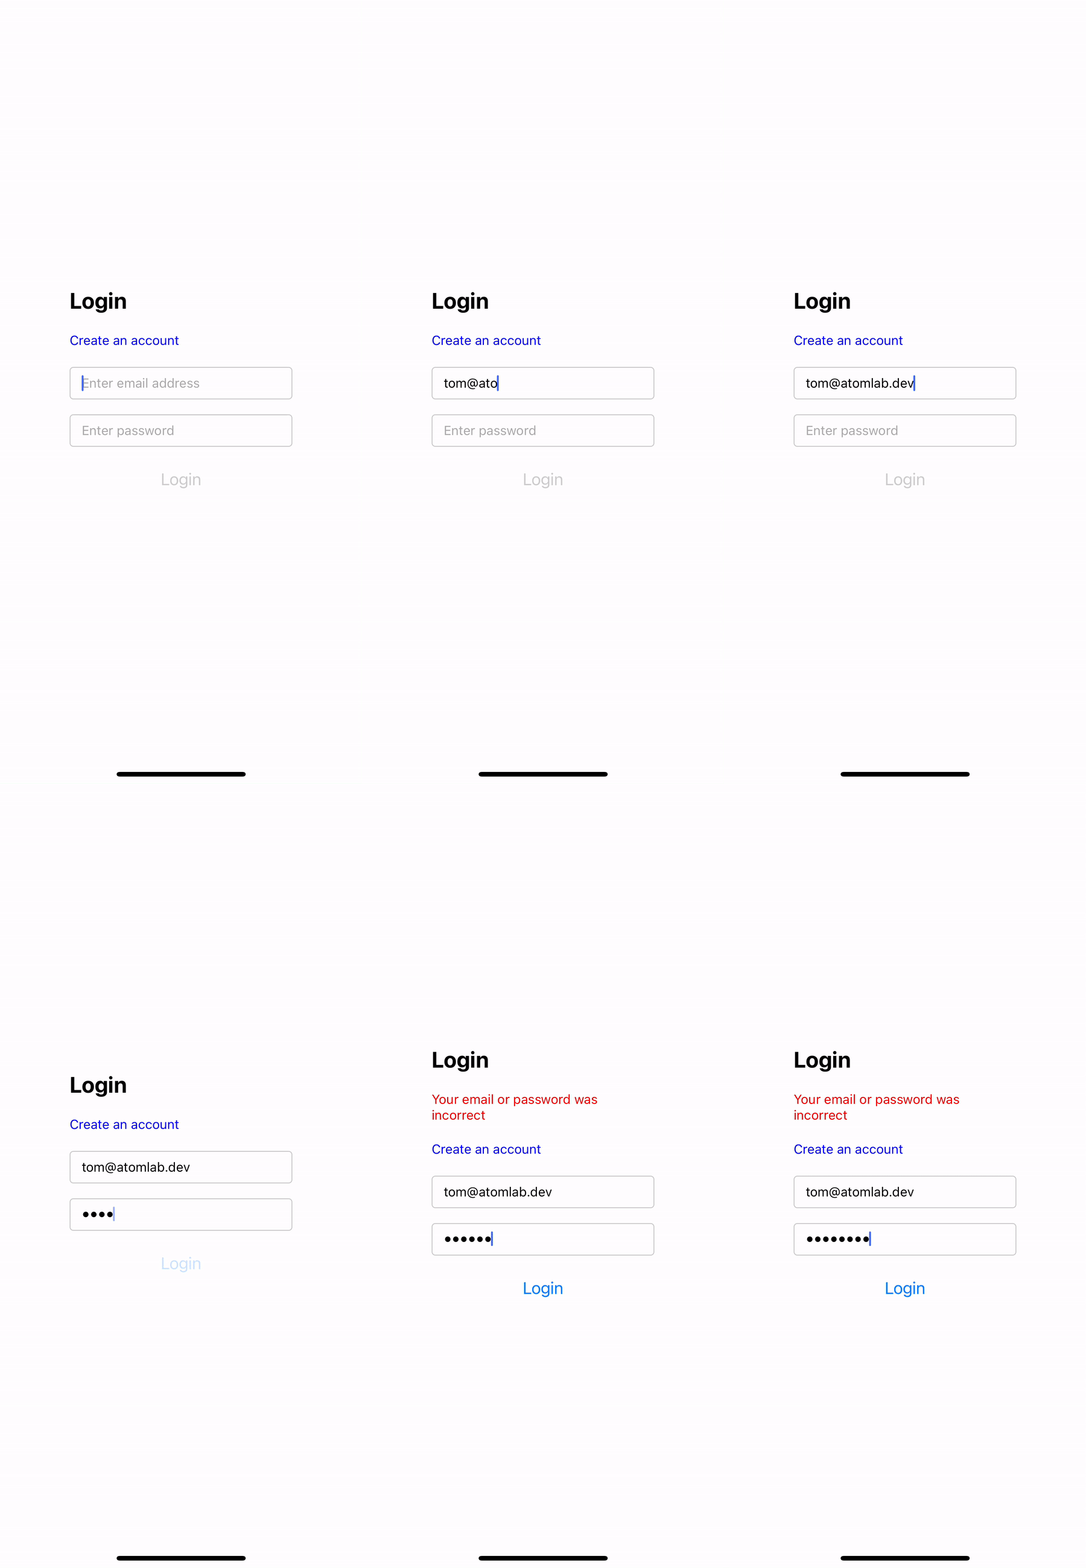
There’s just one more thing we need to take care of - we need to add a reset password form.

Adding a reset password form

Let’s add a new component that will contain our password reset form:

function ResetPassword() { return ( <View style={styles.outer}> <View style={styles.inner}> <Text style={styles.header}>Reset Password</Text> </View> </View> ); }

In your login form add a link that sets the screen to “reset-password”:

<TouchableOpacity onPress={() => setScreen('reset-password')}> <Text style={[styles.link, { color: '#333' }]}>I've forgotten my password</Text> </TouchableOpacity>

In your main App component, inside the getScreen function, add a line that renders the ResetPassword component if the value of screen is set to “reset-password”:

const getScreen = () => { if (loggedIn) return <LoggedIn />; if (screen === 'signup') return <Signup setScreen={setScreen} />; if (screen === 'reset-password') return <ResetPassword setScreen={setScreen} />; return <Login setScreen={setScreen} />; };

In your ResetPassword function, add a link that takes you back to the login screen:

function ResetPassword({ setScreen }) { return ( <View style={styles.outer}> <View style={styles.inner}> <Text style={styles.header}>Reset Password</Text> <TouchableOpacity onPress={() => setScreen('login')}> <Text style={styles.link}>Back to login</Text> </TouchableOpacity> </View> </View> ); }

You should now be able to toggle between the login screen and the reset password screen:
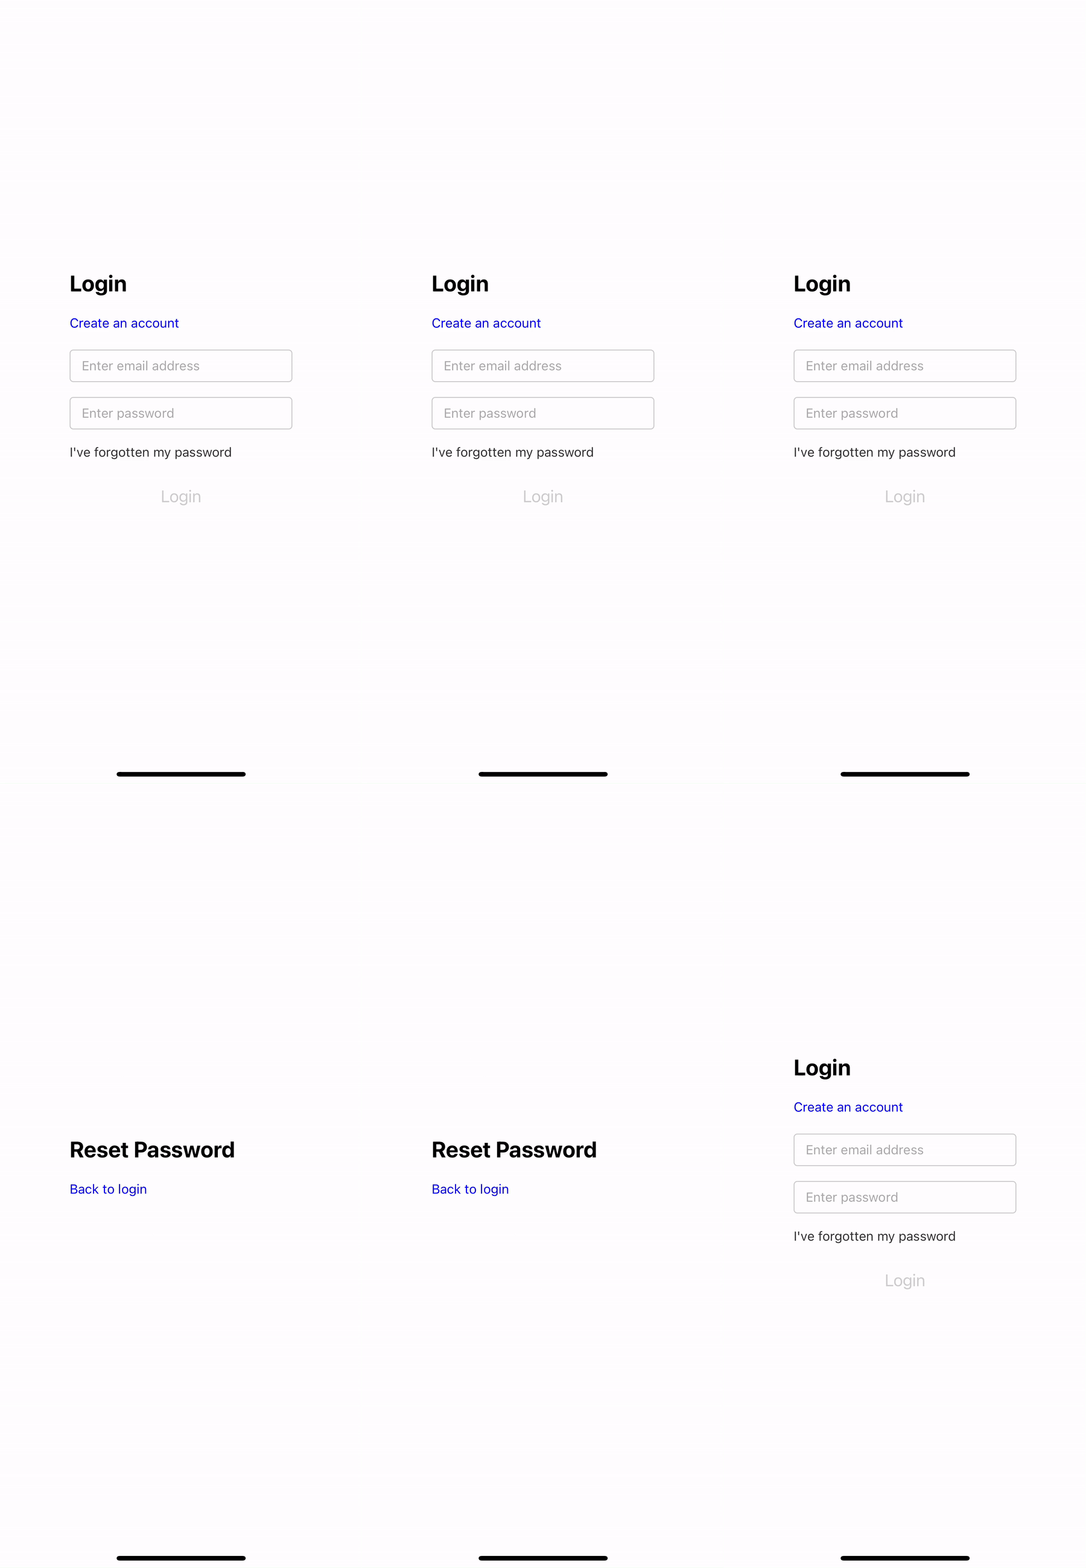
Now we can copy over the email input from our login form and add a state value for the users email, as well as a submit button. As with our other screens we’ll also add error handling.

One more thing - as we won’t be using the onAuthStateChanged method in this instance to handle results of this action, we need to manually trigger something that will let our user know there request has been processed and to check there email. To do that we’ll add another piece of state called submitted which we’ll use later:

function ResetPassword({ setScreen }) { const [email, setEmail] = useState(''); const [error, setError] = useState(null); const [submitted, setSubmitted] = useState(false); const resetUserPassword = () => { // }; return ( <View style={styles.outer}> <View style={styles.inner}> <Text style={styles.header}>Reset Password</Text> {error && <Text style={styles.error}>{error}</Text>} <TouchableOpacity onPress={() => setScreen('login')}> <Text style={styles.link}>Back to login</Text> </TouchableOpacity> <TextInput value={email} onChangeText={setEmail} keyboardType="email-address" placeholder="Enter email address" autoCapitalize="none" placeholderTextColor="#aaa" style={styles.input} /> <Button title="Reset Password" onPress={resetUserPassword} disabled={!email} /> </View> </View> ); }

In order to process the password reset request we need to import the sendPasswordResetEmail method from Firebase:

import { onAuthStateChanged, signOut, createUserWithEmailAndPassword, signInWithEmailAndPassword, sendPasswordResetEmail, } from 'firebase/auth';

Then in our resetUserPassword function we invoke this method by passing in our auth instance and the email address the user has provided. If the request is successful we set submitted to be true - if it fails we provide some basic error handling:

const resetUserPassword = async () => { try { await sendPasswordResetEmail(auth, email); setSubmitted(true); setError(null); } catch (error) { if (error.code === 'auth/user-not-found') { setError('User not found'); } else { setError('There was a problem with your request'); } } };

Now let’s add a confirmation message using the submitted value - if submitted is true we display the confirmation message, if it’s false we show the email input and submit button:

function ResetPassword({ setScreen }) { const [email, setEmail] = useState(''); const [error, setError] = useState(null); const [submitted, setSubmitted] = useState(false); const resetUserPassword = async () => { try { await sendPasswordResetEmail(auth, email); setSubmitted(true); setError(null); } catch (error) { if (error.code === 'auth/user-not-found') { setError('User not found'); } else { setError('There was a problem with your request'); } } }; return ( <View style={styles.outer}> <View style={styles.inner}> <Text style={styles.header}>Reset Password</Text> {error && <Text style={styles.error}>{error}</Text>} <TouchableOpacity onPress={() => setScreen('login')}> <Text style={styles.link}>Back to login</Text> </TouchableOpacity> {submitted ? ( <Text>Please check your email for a reset password link.</Text> ) : ( <> <TextInput value={email} onChangeText={setEmail} keyboardType="email-address" placeholder="Enter email address" autoCapitalize="none" placeholderTextColor="#aaa" style={styles.input} /> <Button title="Reset Password" onPress={resetUserPassword} disabled={!email} /> </> )} </View> </View> ); }

You should now be able to enter your email address (assuming an account is linked to that email) and receive a password reset email:
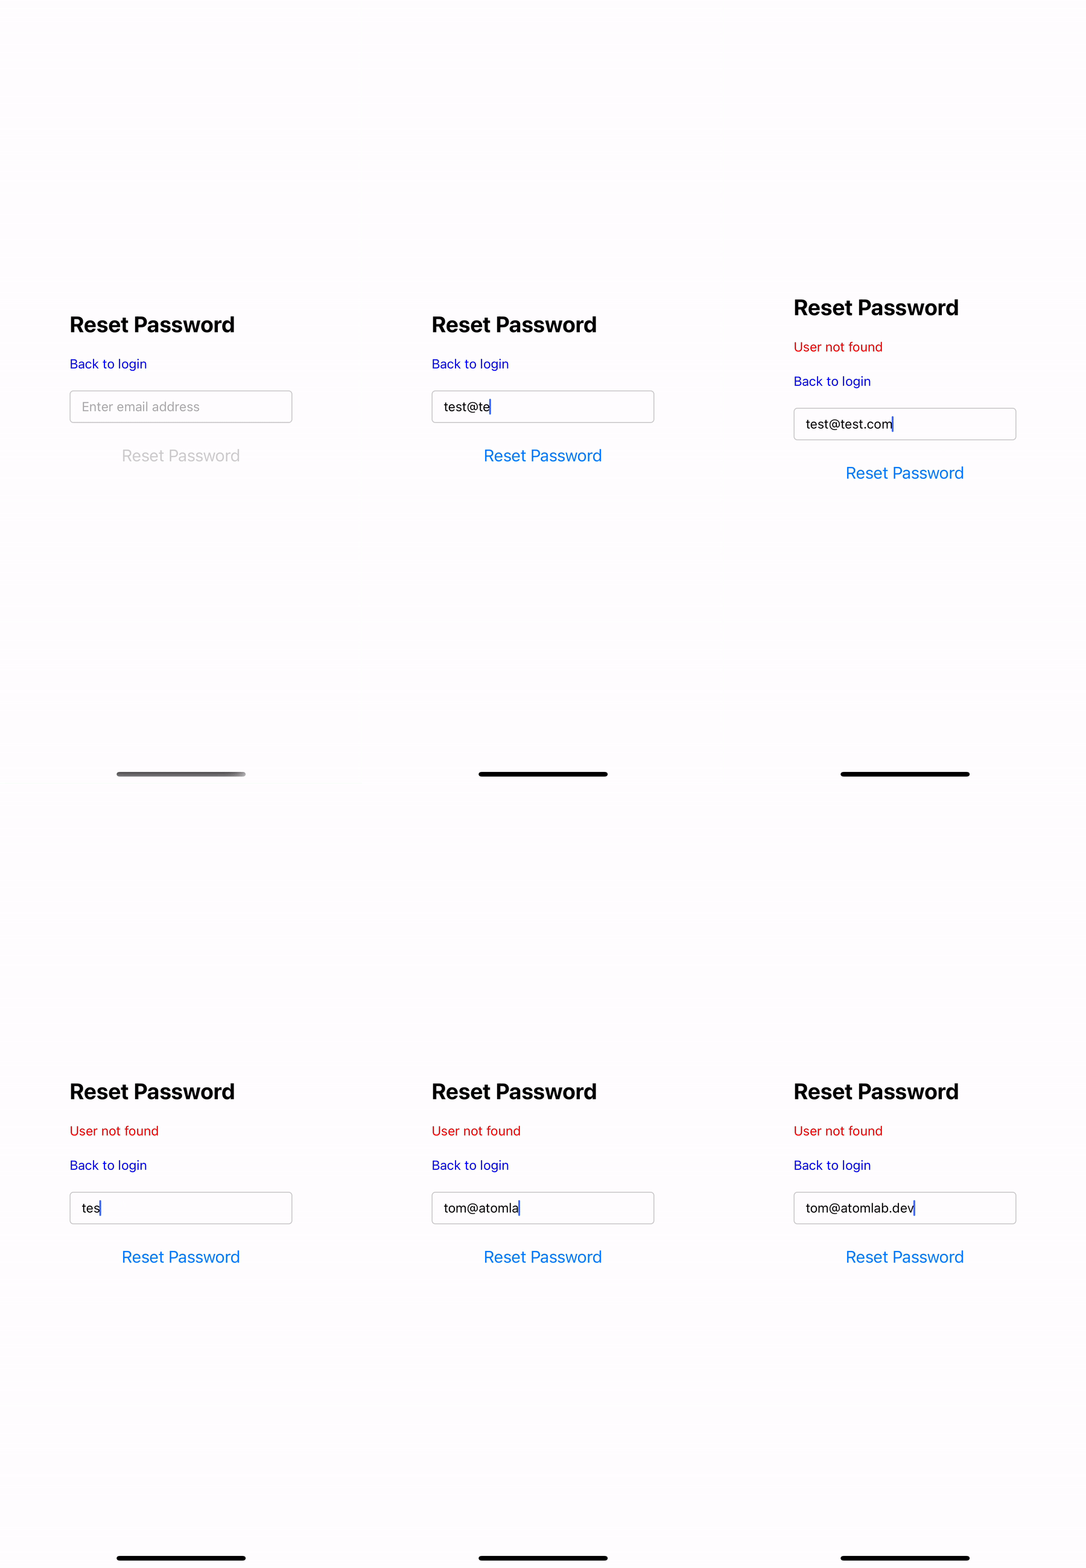
Conclusion

Thanks for reading and I hope this helped you get up and running with Firebase Authentication in React Native - see below for the full code from this example, or check out the Github repo.

Full App.js example

import React, { useState } from 'react'; import { View, Text, Button, TextInput, StyleSheet, TouchableOpacity } from 'react-native'; import { onAuthStateChanged, signOut, createUserWithEmailAndPassword, signInWithEmailAndPassword, sendPasswordResetEmail, } from 'firebase/auth'; import { auth } from './firebase'; function LoggedIn() { const logout = async () => { try { await signOut(auth); } catch (e) { console.error(e); } }; return ( <View style={{ flex: 1, justifyContent: 'center', alignItems: 'center' }}> <Text>Logged in</Text> <Button title="Log out" onPress={logout} /> </View> ); } function Signup({ setScreen }) { const [email, setEmail] = useState(''); const [password, setPassword] = useState(''); const [confirmPassword, setConfirmPassword] = useState(''); const [error, setError] = useState(null); const createAccount = async () => { try { if (password === confirmPassword) { await createUserWithEmailAndPassword(auth, email, password); } else { setError("Passwords don't match"); } } catch (e) { setError('There was a problem creating your account'); } }; return ( <View style={styles.outer}> <View style={styles.inner}> <Text style={styles.header}>Signup</Text> {error && <Text style={styles.error}>{error}</Text>} <TouchableOpacity onPress={() => setScreen('login')}> <Text style={styles.link}>Login to existing account</Text> </TouchableOpacity> <TextInput value={email} onChangeText={setEmail} keyboardType="email-address" placeholder="Enter email address" autoCapitalize="none" placeholderTextColor="#aaa" style={styles.input} /> <TextInput value={password} onChangeText={setPassword} secureTextEntry placeholder="Enter password" autoCapitalize="none" placeholderTextColor="#aaa" style={styles.input} /> <TextInput value={confirmPassword} onChangeText={setConfirmPassword} secureTextEntry placeholder="Confirm password" autoCapitalize="none" placeholderTextColor="#aaa" style={styles.input} /> <Button title="Create Account" onPress={createAccount} disabled={!email || !password || !confirmPassword} /> </View> </View> ); } function Login({ setScreen }) { const [email, setEmail] = useState(''); const [password, setPassword] = useState(''); const [error, setError] = useState(null); const loginUser = async () => { try { await signInWithEmailAndPassword(auth, email, password); } catch (error) { if (error.code === 'auth/invalid-email' || error.code === 'auth/wrong-password') { setError('Your email or password was incorrect'); } else if (error.code === 'auth/email-already-in-use') { setError('An account with this email already exists'); } else { setError('There was a problem with your request'); } } }; return ( <View style={styles.outer}> <View style={styles.inner}> <Text style={styles.header}>Login</Text> {error && <Text style={styles.error}>{error}</Text>} <TouchableOpacity onPress={() => setScreen('signup')}> <Text style={styles.link}>Create an account</Text> </TouchableOpacity> <TextInput value={email} onChangeText={setEmail} keyboardType="email-address" placeholder="Enter email address" autoCapitalize="none" placeholderTextColor="#aaa" style={styles.input} /> <TextInput value={password} onChangeText={setPassword} secureTextEntry placeholder="Enter password" autoCapitalize="none" placeholderTextColor="#aaa" style={styles.input} /> <TouchableOpacity onPress={() => setScreen('reset-password')}> <Text style={[styles.link, { color: '#333' }]}>I've forgotten my password</Text> </TouchableOpacity> <Button title="Login" onPress={loginUser} disabled={!email || !password} /> </View> </View> ); } function ResetPassword({ setScreen }) { const [email, setEmail] = useState(''); const [error, setError] = useState(null); const [submitted, setSubmitted] = useState(false); const resetUserPassword = async () => { try { await sendPasswordResetEmail(auth, email); setSubmitted(true); setError(null); } catch (error) { if (error.code === 'auth/user-not-found') { setError('User not found'); } else { setError('There was a problem with your request'); } } }; return ( <View style={styles.outer}> <View style={styles.inner}> <Text style={styles.header}>Reset Password</Text> {error && <Text style={styles.error}>{error}</Text>} <TouchableOpacity onPress={() => setScreen('login')}> <Text style={styles.link}>Back to login</Text> </TouchableOpacity> {submitted ? ( <Text>Please check your email for a reset password link.</Text> ) : ( <> <TextInput value={email} onChangeText={setEmail} keyboardType="email-address" placeholder="Enter email address" autoCapitalize="none" placeholderTextColor="#aaa" style={styles.input} /> <Button title="Reset Password" onPress={resetUserPassword} disabled={!email} /> </> )} </View> </View> ); } export default function App() { const [loggedIn, setLoggedIn] = useState(false); const [screen, setScreen] = useState(null); onAuthStateChanged(auth, (user) => { if (user) { setLoggedIn(true); } else { setLoggedIn(false); } }); const getScreen = () => { if (loggedIn) return <LoggedIn />; if (screen === 'signup') return <Signup setScreen={setScreen} />; if (screen === 'reset-password') return <ResetPassword setScreen={setScreen} />; return <Login setScreen={setScreen} />; }; return <View style={{ flex: 1 }}>{getScreen()}</View>; } const styles = StyleSheet.create({ outer: { flex: 1, justifyContent: 'center', alignItems: 'center', }, inner: { width: 240, }, header: { fontSize: 24, fontWeight: 'bold', marginBottom: 20, }, input: { borderWidth: 1, borderColor: '#ccc', borderRadius: 4, paddingVertical: 8, paddingHorizontal: 12, marginBottom: 16, }, error: { marginBottom: 20, color: 'red', }, link: { color: 'blue', marginBottom: 20, }, });

Copyright 2024 - Atom Lab | Privacy Policy | Terms and Conditions